

How To Make A Lego Combination Safe
When I saw this working combination lock I was amazed by it's design and started to build it.
While learning how it worked, I tried different modifications, to learn why Il Buono made his design choices. And I must say he did them really well. Even-tough it's well design there where 3 things bothering me:
First thing
One of the things that bothered me was that it's attached with axles to the door in a way that they're visible at the front of the safe.
Second thing
Next to that it's 6 studs deep and so takes half of the space in the safe.
And the bottom part takes 2 studs deep.
3rd thing
The original slider is wide, it dictates the size of the safe.
Improvements
I made many iterations and posted them in the comments at LEGO IDEAS. I build over 20 total different versions and was looking to add a backdoor as well; a way to open the mechanism via a hidden button, like when a villain would put in TNT into a hidden door on the side. How that one worked out you'll see later in an other MOC (don't forget to follow !).
This MOC improves the dept of the model: It's only 3 studs deep (instead of 6) and fits in the original Lego Ideas design. And the lower part is even more free: there is no need for the lock to go low (so 0 instead of 2 bricks).
How did I do it?
At first the connection to the door needed to change from axle to something else. So I have tried all possible connectors Lego has and eventually found a way to provide Technic pin-holes that fit within the original design.
Second the slider needed more room, that was very tricky and took many iterations. This is, because if the upper and bottom part of the slider arms do not attach to the door at the same location, the slider will work less smooth. This is because Lego axles are flexible under tension and a blocking mechanism (like a lock) puts tension on the attachment, and when the tension is asymmetrically applied bricks and connectors move.
Providing more space and same anchor points for the slider made the build almost impossible, but eventually I found a way to attach the upper slider in a totally new way. In order to do so, I needed to change to opening lever. And that was a big challenge, because the initial one is robust and well designed. So getting something that works equally great but takes less space ... well . .. :)
And then finally I needed to reduce the width of the tumbler and it's attaching mechanism while maintaining the same number of combination codes and it needed to work always. I played a lot with many different bricks. And then LEGO BOOST was put on my table by my kids because it did not work... and I found the small orange rubber pieces. They would be ideal, but how to make sure the locking lever is always moving up when needed and will never block rotation of the tumbler mechanism. Turns out, when low, it needs to at least touch 2 of the rubber orange link tread attachments. And the lever needs to lean on the top of the tumbler when down.
The locking lever is now way more simplified, I made over 15 different leves.
Wish
There are two bricks that I miss for this MOC. An axle 6 and 7 with stop. This will reduce the width of this lock by even an other stud, while still being fully operational.
Smaller safe?
This makes it possible to make the safe 2 studs smaller on all sides. But I have tried that as well. And found that my kids love bigger vaults over a smaller one; they can fit more stuff in. They do not care that the minifigure is smaller, they are used to stories about Scrooge McDuck and his large swimming pool of coins; also all out of proportion 😀 so that's what they expect a bank should have : an out of proportion safe.
Opening the lock
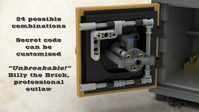
So here is the result of all that work on improving the lock, this is one of my two tiniest working combination lock that still has 26 combination possibilities. The combination has to put be in order, so 12 will not work if 21 is the combination 😁 - so make sure you know the combination!
And of cause the default combination gives you the answer to the "Question of Life, the Universe, and Everything", but you can change the combination to any you like.
Tested
It's been tested by kids who played with it for hours and hours weeks after week. So it should work properly.
My challenge for you
At first I'll give you the lock without the door. The door attachment has a magic trick that makes this work smooth. I'll first give you the time to figure out via looking at the pictures and building the lock, how that works. Post your findings in the comments! And your pictures are also very welcome :-)
What's next? Don't forget to Like and Follow and look at my other creations 😊
More coming up soon! You'll see a MOC with that full operational door and maybe e ven a new lock where you can more easily change the combination... so ...
Happy building!
How To Make A Lego Combination Safe
Source: https://rebrickable.com/mocs/MOC-49265/BrickDesignerNL/combination-lock/
Posted by: kosstrumsess.blogspot.com
0 Response to "How To Make A Lego Combination Safe"
Post a Comment